
Azure Functions enable running tasks in the background and can work with a range of triggers. You start by creating a Function App and you can add multiple functions to that app. The functions can be in different languages.
This post describes how to:
- Set up your local environment
- Add the required packages
- Add triggers and bindings
- Use application settings
- Build and run the function locally
The function that I’m about to build will search index I built on a Cosmos DB knowledge base store, format, and send the search results in an email. The search phrase comes from a queue of newly created service requests. I’m using SendGrid as the email service. You can sign up for a SendGrid trial account and get a SendGrid API key.
Build Azure Functions locally
You can create functions on the Azure portal, supply test data, run the function, and view the output. I find it more convenient to work with the function code in an IDE like Visual Studio as it allows me to easily reference packages and debug code.
Azure Function Core Tools enables you to work with functions locally on your desktop. It contains the same Azure Function runtime that your functions run on in the Azure portal.
Install the Azure Function Core tools using npm.
npm i -g azure-functions-core-tools
Create a new function app
Follow the steps specified here to create an Azure Functions project and add a c# function with a queue trigger.
NuGet packages
Right-click on the Azure Functions project and select Manage NuGet packages... Search and install the below packages to start working with Azure Search and SendGrid.

Triggers and Bindings
Irrespective of the language that you build your function in, a file called function.json is created. This file contains details about the function trigger and the input and output bindings. The following is the content of the function.json file from the send email function.
{
        "generatedBy": "Microsoft.NET.Sdk.Functions-1.0.0.0",
        "configurationSource": "attributes",
        "bindings": [
          {
            "type": "queueTrigger",
            "queueName": "%ServiceDeskQueue%",
            "connection": "QueueStorageAccount",
            "name": "ticket"
          }
        ],
        "disabled": false,
        "scriptFile": "..\\bin\\ServiceDesk.Function.SendEmail.dll",
        "entryPoint": "ServiceDesk.Function.SendEmail.SendAckEmail.Run"
      }
ticket is the function trigger that gets fired when a message is added to the servicedeskemail queue. QueueStorageAccount is configured in app settings and has the connection string to the queue storage account.
The main method Run receives a QueueTrigger parameter. An out parameter of type Mail references the SendGrid email message.
public static void Run([QueueTrigger("%ServiceDeskQueue%", Connection = "QueueStorageAccount")]Ticket ticket,
    TraceWriter log,
    [SendGrid(ApiKey = "SendGridKey", From = "%SendGridFromAddress%")] out Mail message)
Use application settings
When developing locally, app settings go into the local.settings.json file. You need to specify a storage account for AzureWebJobsDashboard and AzureWebJobsStorage app settings. You can use either ConfigurationManager.AppSettings or System.Environment.GetEnvironmentVariable to read app settings.
Invoking Azure Search
var searchClient = new SearchServiceClient(ConfigurationManager.AppSettings["AzureSearchServiceName"],
new SearchCredentials(ConfigurationManager.AppSettings["AzureSearchAPIKey"]));
var indexClient = searchClient.Indexes.GetClient(ConfigurationManager.AppSettings["AzureSearchIndexName"]);

//Build the SearchParameter object
SearchParameters sp = new SearchParameters();
sp.SearchMode = SearchMode.All;
sp.SearchFields = new[] { "Title", "Description", "Categories", "Content" };
var searchPhrase = $"{ticket.Title} {ticket.Description}";
//Execute the search against the Knowledge Base search index
var results = indexClient.Documents.Search(searchPhrase, sp);
Sending the email using SendGrid
Create a new Mail object and set all the required properties.
private static Mail SendAcknowledgementEmail(Ticket ticket, string kbArticles)
{
    Mail message = new Mail
    {
        Subject = "Your request has been submitted."
    };
    var personalization = new Personalization();
    personalization.AddTo(new Email(ticket.Email));

    Content content = new Content
    {
        Type = "text/html",
        Value = "Ticket No: " + ticket.Id.ToString() + "<br /> The following knowledge base articles matched your request: " + kbArticles
    };
    message.AddContent(content);
    message.AddPersonalization(personalization);
    return message;
}
Testing functions
You can run the function by pressing F5 in Visual Studio. Or you can use the command line tools.
Open the command prompt. Go to the …\bin\Debug\net461 folder under your function app’s project folder. Why, you ask. Find the answer on the Azure Functions GitHub issues page.
Execute the command func host start --debug vs.
Output
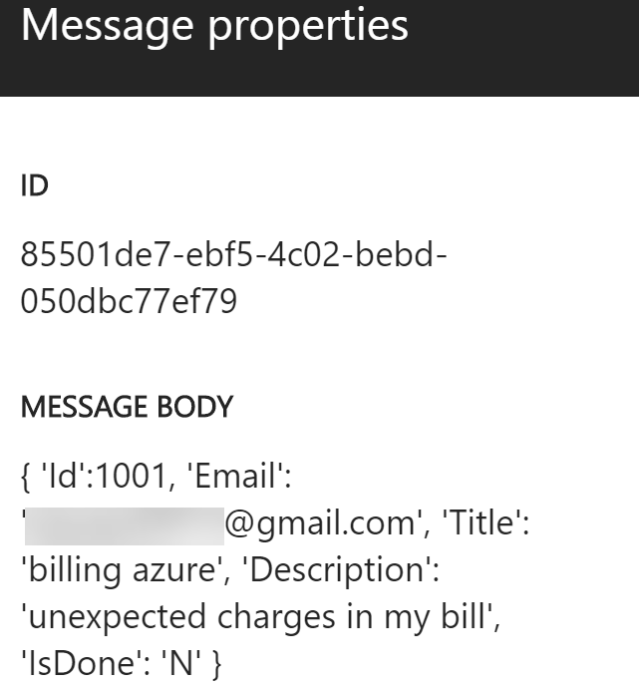
The below image shows a sample message that was added to the queue.
Email generated after the above message was processed.
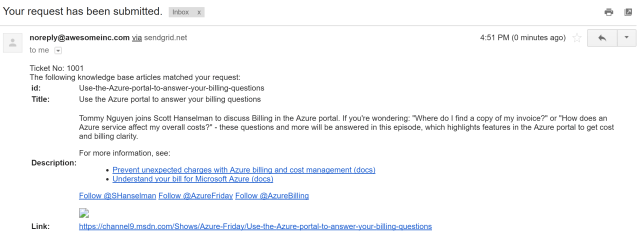
The above example is a bit contrived but you get the idea.
