
In Part 2 of this series, I’m going to demonstrate automating ACR creation. To follow along with this post you’ll need all the files created in Part 1. I’m also assuming you have a build pipeline setup that builds and pushes a container to ACR.
We’ll now add an ARM template to deploy ACR. You can delete the ACR that you created in Part 1 as we will create one using the build pipeline.
In addition to the two tasks already present in the build pipeline, we need an Azure PowerShell task to deploy the ARM template. The ACR name will be generated in the ARM template as it needs to be unique. We also need to set an Azure DevOps pipeline variable to that autogenerated name so that it will be available in the following steps.
ARM Template
Add a Deploy folder in your web API project. Under that folder, add a new JSON file. This is for the ARM template.
{
  "$schema": "https://schema.management.azure.com/schemas/2019-04-01/deploymentTemplate.json#",
  "contentVersion": "1.0.0.0",
  "parameters": {
    "acrName": {
      "type": "string",
      "defaultValue": "[concat('acr', uniqueString(resourceGroup().id))]",
      "minLength": 5,
      "maxLength": 50,
      "metadata": {
        "description": "Globally unique name of your Azure Container Registry"
      }
    },
    "acrAdminUserEnabled": {
      "type": "bool",
      "defaultValue": false,
      "metadata": {
        "description": "Enable admin user that has push / pull permission to the registry."
      }
    },
    "location": {
      "type": "string",
      "defaultValue": "[resourceGroup().location]",
      "metadata": {
        "description": "Location for registry."
      }
    },
    "acrSku": {
      "type": "string",
      "defaultValue": "Basic",
      "allowedValues": [
        "Basic"
      ],
      "metadata": {
        "description": "Tier of your Azure Container Registry."
      }
    }
  },
  "resources": [
    {
      "comments": "Container registry for storing docker images",
      "type": "Microsoft.ContainerRegistry/registries",
      "apiVersion": "2019-12-01-preview",
      "name": "[parameters('acrName')]",
      "location": "[parameters('location')]",
      "sku": {
        "name": "[parameters('acrSku')]",
        "tier": "[parameters('acrSku')]"
      },
      "tags": {
        "displayName": "Container Registry",
        "container.registry": "[parameters('acrName')]"
      },
      "properties": {
        "adminUserEnabled": "[parameters('acrAdminUserEnabled')]"
      }
    }
  ],
  "outputs": {
    "containerRegistryName": {
      "value": "[reference(resourceId('Microsoft.ContainerRegistry/registries',parameters('acrName')),'2019-12-01-preview').loginServer]",
      "type": "string"
    }
  }
}
Add a new PowerShell file under the same folder. This will contain the script that deploys the abovementioned ARM template. It will also read the output variable containerRegistryName after the deployment and will set the environment variable to that value.
param(
    [string] $ResourceGroupName
)


$templateFilePath = [System.IO.Path]::Combine($PSScriptRoot, 'template.json')

$rgDeploymentOutput = New-AzResourceGroupDeployment `
    -ResourceGroupName $ResourceGroupName `
    -TemplateFile $templateFilePath

foreach ($key in $rgDeploymentOutput.Outputs.Keys)
{
    $value = $rgDeploymentOutput.Outputs[$key].Value
    Write-Host "##vso[task.setvariable variable=$key]$value"
}
Manifest File
We’ll use the kubectl apply command in our release pipeline to create the AKS pod and deploy the container to the pod. This command takes a YAML file. In this file, we need to specify the ACR name from which to pull the container and the name of the container to be deployed. This is where we will use the environment variable we set above. The container is also versioned by BuildId which is also generated automatically. The YAML file will initially contain placeholder values for the ACR name and BuildId. We need to replace the placeholder values with the autogenerated values using the Replace tokens task.
Let’s create a folder called Manifest for this file.
apiVersion: apps/v1
kind: Deployment
metadata:
  name: weatherinfoapi-deployment
spec:
  selector:
    matchLabels:
      app: weatherinfoapi-pod
  template:
    metadata:
      labels:
        app: weatherinfoapi-pod
    spec:
      containers:
      - name: weatherinfoapi-container
        image: __containerRegistryName__/weatherapi:__Build.BuildId__
        imagePullPolicy: Always
        resources:
          limits:
            memory: "128Mi"
            cpu: "500m"
        ports:
        - containerPort: 5000
---
apiVersion: v1
kind: Service
metadata:
  name: weatherapi-service
spec:
  selector:
    app: weatherapi-pod
  ports:
  - port: 8080
    targetPort: 5000
  type: LoadBalancer
As I mentioned earlier, we don’t need this file until the last step of deploying the container on AKS but since we have to generate and manipulate the file, I’ll go through the contents of this file now.
- Deployment – Declarative description of pods. Manages one or more pods. The deployment in our file specifies a single pod.
- Pod – Containers run within a pod.
Pods are the smallest deployable units of computing that you can create and manage in Kubernetes.
https://kubernetes.io/docs/concepts/workloads/pods/
- Service – A way to expose pods using an IP address. Pods are not permanent. They get created and removed automatically by deployments. Service help with the discovery of pods. Services are attached to pods by means of labels. In the manifest above, selector in the service is set to app: weatherinfoapi-pod. The selector is of type LoadBalancer which ensures there is an external IP address assigned to the pod.
Note, we have two placeholders in the manifest file – __containerRegistryName__ and __Build.BuildId__.
Pipeline Variables
The next step is to add a variable in Azure DevOps. I’m using the same name as my output variable in my ARM template. Add a new pipeline variable under the Variables tab of your build pipeline. Add one more variable for the resource group name.
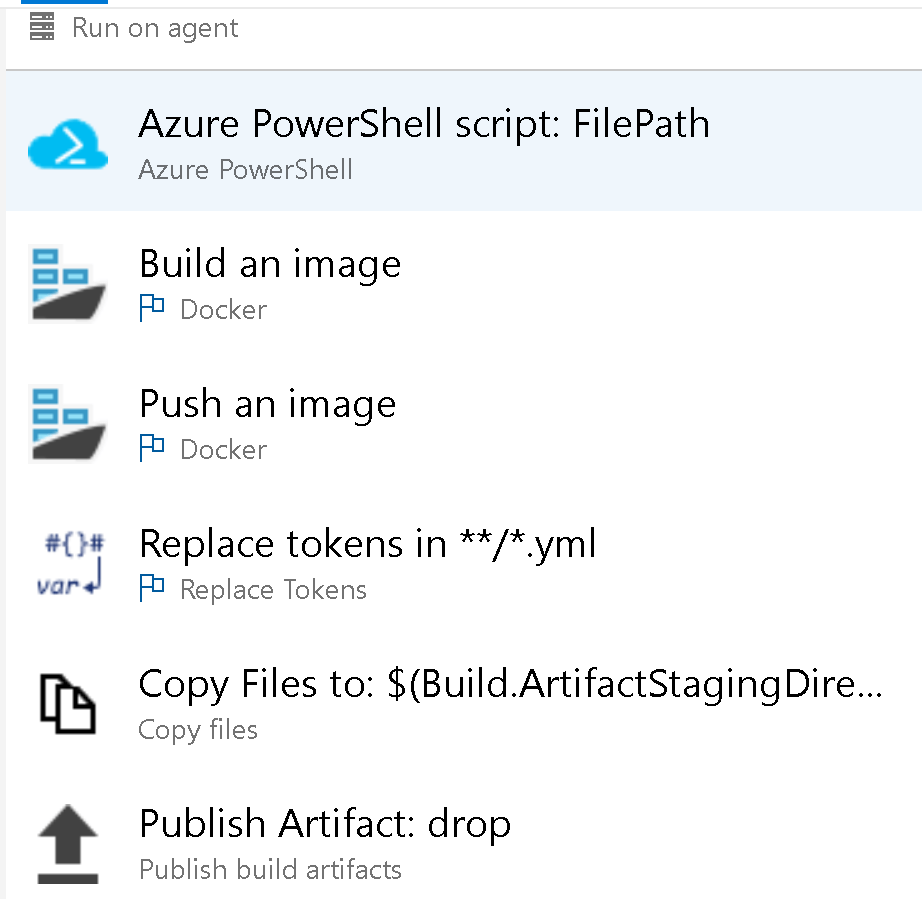
Pipeline Tasks
Let’s now see how we need to configure the tasks in the build pipeline.
Azure PowerShell
Add this as the first task in the pipeline as the ACR needs to be created before we can push a container to it. In the Script Path, select the PowerShell file. For Script Arguments, pass the resource group name like so – ResourceGroupName $(resourceGroupName).
Build an image
Set the container name parameter to $(containerRegistryName).
Push an image
Set the container name parameter to $(containerRegistryName).
Replace tokens
You may have to install the replace tokens task from the Marketplace if you haven’t used it already. For Target files, specify YAML files. Under Advanced, change the token prefix and suffix to __.
Copy Files
Copy all the files under the Manifests folder to the staging directory.
Publish Artifact
We need publish the artifacts so that the manifest file will be available in the release pipeline.
Now Save and Queue the pipeline. A new ACR should be created and it should contain the container in its repositories.
