
This post describes the process of setting up Azure AD and modifying an Angular Single Page Application to authenticate users using the ADAL library. Angular version 4 is being used. Part II of the post will describe passing the authentication token to the back-end Web API.
Azure AD setup – Creating applications in AD
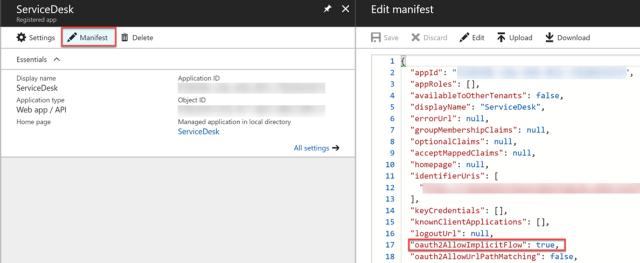
Follow the steps given in the article Register your application with your Azure Active Directory tenant to register your front-end and back-end applications with Azure AD. The OAuth 2 implicit flow needs to be enabled as mentioned in the last section of the article.
ADAL
Install the ng2-adal package. I’m using the 2.0 version. For further details see https://www.npmjs.com/package/ng2-adal.
Initiating ADAL
Add a service called auth.service that will return ADAL configuration values.
@Injectable()
export class AuthService {

    constructor(private adalService: AdalService) { }

    public get adalConfig(): any {
        return {
            tenant: '<tenantid>.onmicrosoft.com',
            clientId: '<client_id of SPA>',
            redirectUri: window.location.origin + '/',
            postLogoutRedirectUri: window.location.origin + '/',
            resourceId: '<resource url of Web API>'
        };
    }

    getToken() {
        return this.adalService.getCachedToken(this.adalConfig.clientId);
    }
}
}
Call the adalService.init method in the AppComponent’s constructor. These values are passed to the 2.0 endpoint as query string values when the user logs in.
constructor(
        private configurationService: ConfigurationService,
        private adalService: AdalService,
        private authService: AuthService
    ) {

        this.configurationService.load();
        this.adalService.init(this.authService.adalConfig);

    }
Route guard
Implement a service for redirecting users to the login component unless they are authenticated.
@Injectable()
export class RouteGuard implements CanActivate {
    constructor(private adalService: AdalService,
        private router: Router) { }

    canActivate() {
        if (this.adalService.userInfo.isAuthenticated) {
            return true;
        } else {
            this.router.navigate(['/login']);
            return false;
        }
    }
}
Don’t forget to include the canActivate guard while implementing the app’s routing logic. It will look similar to the below lines of code.
 RouterModule.forRoot([
{ path: '', redirectTo: 'home', pathMatch: 'full' },
{ path: 'home', component: HomeComponent, canActivate: [RouteGuard] },
{ path: 'login', component: LoginComponent },
{ path: 'logout', component: LogoutComponent, canActivate: [RouteGuard]},
{ path: '**', redirectTo: 'home' }
])
Login component
Create a login component that allows the user to login into your website. Clicking on the login button takes the user to the OAuth 2.0 authorize endpoint. User then enters their login details and once they are authenticated, an id_token is returned to the site. A session is established between the user and Azure AD.
@Component({
    selector: 'welcome',
    template: '<h1>Please login to use the app.</h1><button (click) = "logIn()" > Login </button>'
})
export class LoginComponent {

    constructor(
        private router: Router,
        private adalService: AdalService,
        private authService: AuthService
    ) {
        if (this.adalService.userInfo.isAuthenticated) {
            this.router.navigate(['/home']);
        }
    }

    public logIn() {
        this.adalService.login();
    }
}
ID token
ADAL caches the token by default. I’ve added the below method to the auth.service to return the id_token.
getToken() {
	return this.adalService.getCachedToken(this.adalConfig.clientId);
}
You can have a look at the contents of the JSON Web Token on the jwt.io website. One of the claim types exp, is the token expiration time. It is represented as an epoch time. Sites like http://www.epochconverter.com can convert an epoch time to your local time zone.
Logout
Finally, create a component that implements the logout functionality.
export class LogoutComponent implements OnInit {

    constructor(
        private adalService: AdalService,
        private router: Router
    ) { }

    ngOnInit() {
        this.adalService.logOut();
        this.router.navigate(['login']);
    }
