
This post describes the process of generating JSON documents and migrating the generated JSON content to Azure Cosmos DB.
The idea is to include links to knowledge base articles and videos in the service request acknowledgement email for the service desk application that I’m building. The customer may be able to solve their problem based on the infomation provided in the linked articles or videos, without having to wait for the contact centre staff to get back to them.
The knowledge base data is going to be hosted in Azure Cosmos DB. It’s a NoSQL data store and therefore does not enforce a schema on the data. It will be a good fit for the particular use case we’re looking at as input for a knowledge base can come from various sources like product documentation and announcements, user training material, issue resolution logs, and technical support. They can be in the form of how-to articles, articles in a tutorial format or even videos.
All the input will usually go through a review and approval process to make sure they use consistent language and to check that the solution actually works. But not all types will essentially have the same properties. At the moment, I have two types of documents – Articles and Videos. Both Article and Video type documents are stored in the same collection, kb.
Microsoft to the rescue
In order to populate the KB, I need content and I need it fast. I used Microsoft Azure blog and Azure Fridays RSS feeds to generate content. I built a tool that reads RSS feeds and creates JSON documents. The JSON documents are then uploaded to Cosmos DB using the Azure Cosmos DB Data Migration tool.
static void Main(string[] args)
    {
        var type = "Article";
        string jsonText = "";
        string url = "<enter feed url>";
        var r = XmlReader.Create(url);
        var feed = SyndicationFeed.Load(r);
        r.Close();

        List<Data> data = new List<Data>();

        foreach (SyndicationItem item in feed.Items)
        {
            var subject = item.Title.Text;
            var summary = item.Summary.Text;
            var link = item.Links.FirstOrDefault<SyndicationLink>().Uri.AbsoluteUri;
            var categories = item.Categories;
            var id = item.Id;
            string content = null;
            foreach (SyndicationElementExtension ext in item.ElementExtensions)
            {
                if (ext.GetObject<XElement>().Name.LocalName == "encoded")
                    content = ext.GetObject<XElement>().Value;
            }

            data.Add(new Data()
            {
                Type = type,
                id = id.Split('/').Last(),
                Title = subject,
                Description = summary,
                Link = link,
                Content = content,
                Categories = categories.Select<SyndicationCategory, Category>(cat => new Category()
                { Name = cat.Name }).ToList()

            });

        }


        jsonText = JsonConvert.SerializeObject(data.ToArray());

        //write string to file
        System.IO.File.WriteAllText(@"blogfeed.json", jsonText);


        Console.ReadKey();
    }
}

internal class Data
{
    public Data()
    {
    }

    public string Type { get; set; }
    public string id { get; set; }
    public string Title { get; set; }
    public string Description { get; set; }
    public string Link { get; set; }
    public List<Category> Categories { get; set; }
    public string Content { get; set; }
}

class Category
{
    public string Name { get; set; }
}
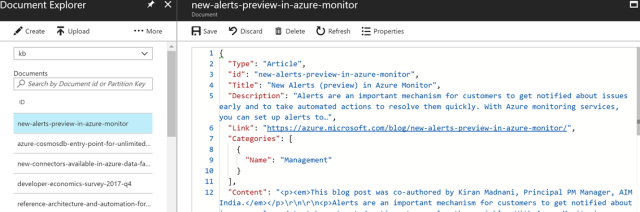
Comparison of an Article-type JSON and a Video-type JSON document
The only difference between article and video documents, apart from the obvious type difference, is the Content property. The textual Content property is null in the case of videos.
How to upload JSON documents to Azure Cosmos DB?
- Download the tool from the link provided in the Microsoft Azure Documentation page. The documentation has more details on configuring advanced settings and indexing policies.
-
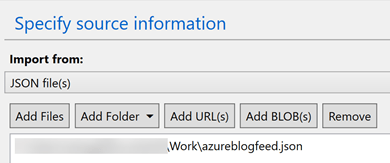
Specify the Source Information. You can either select a single JSON file or select an entire folder.
-
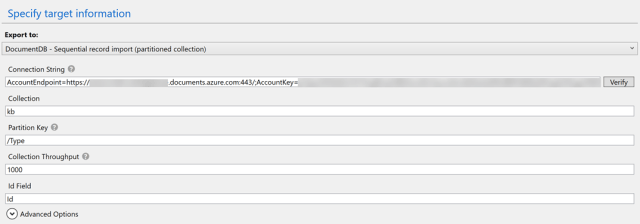
Specify the Target Information. The Connection string needs to be in the below format. If you copy the connection string from the Azure portal > Cosmos DB Keys page, make sure to include the Database name at the end.
AccountEndpoint=<endpointurl>;AccountKey=<cosmosdbaccountkey>;Database=<dbname>
- Leave the defaults in the Advanced setting tab and click Import on the Summary tab.
Viewing the migrated documents
Go to the Azure Cosmos DB account page in Azure portal and click Document Explorer. You can then browse the uploaded documents.
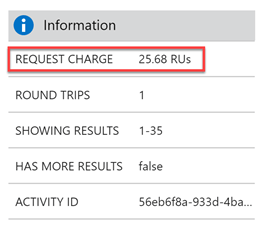
Another option is to use the Query Explorer. Query Explorer returns information on the Request Units (RUs) used by the query at the bottom of the left-hand pane.
Deleting unwanted documents
Currently, there is no way to delete documents from a collection on the Azure portal. I created a stored procedure based on the bulkDeleteSproc stored proc in the Azure GitHub repo and used it to delete documents during my experimentation with the migration tool.
